
If you’ve spent any time with MikroTik’s container feature, you already know how it goes — you get one thing running and suddenly you want to run everything on it. This time I wanted a proper OpenConnect VPN server, the kind that speaks Cisco AnyConnect protocol, sitting directly on my MikroTik as a container. No separate VPS, no extra monthly cost, just the router doing one more useful thing. The good news is that once you understand how the container networking fits together on RouterOS, the whole setup of ocserv MikroTik container is pretty clean. Let me walk you through it step by step.
ocserv MikroTik container?! What We’re Building?!
Before touching anything, here’s the full picture:
- MikroTik RouterOS 7.22.1 running with a public IP on ether1
- We’ll run aminvakil/ocserv as a container, give it a static IP on an internal bridge (172.18.0.3), and forward external port 4433 to it
- VPN clients will get IPs from the 10.10.10.0/24 pool
- Their internet traffic goes out through WAN (ether1) — same as any other device on the network
One thing worth flagging before we start: the reason we’re using port 4433 externally instead of 443 is to avoid conflicts with any other service that might already be listening on 443. The container itself listens on 443 internally — that’s fine. We just forward a different external port to it.
Prerequisites
Make sure you have these in place before running any command:
- RouterOS version: 7.12 or later (tested on 7.22.1) Container mode: Enabled (container: yes)
- Container bridge: An existing bridge — e.g. bridge1-container with gateway 172.18.0.1 Registry: https://registry-1.docker.io (Docker Hub) tmpdir: Must be set — RouterOS needs scratch space to unpack image layers
Enable Container Mode
Check first:
/system/device-mode/print
If you don’t see container: yes, enable it:
/system/device-mode/update container=yes
Then physically press the reset or mode button on the device when it prompts you. This is MikroTik’s way of confirming you have physical access to the hardware before enabling something this powerful. Annoying if you’re remote, but it’s a genuinely good safety check.
Set the Registry and tmpdir
Run this once before anything else:
/container/config/set registry-url=https://registry-1.docker.io tmpdir=/pull
Don’t skip the tmpdir. Without it, image layer extraction fails with a “broken tar” error and you’ll spend a while wondering what went wrong before you find the fix.
Step 1 — Create the veth Interface
Every container on MikroTik needs its own virtual ethernet interface. This is how the router and the container talk to each other.
/interface veth add name=veth-ocserv address=172.18.0.3/24 gateway=172.18.0.1
We’re giving the container the IP 172.18.0.3. The gateway 172.18.0.1 is the bridge — the router’s side of that connection.
Step 2 — Attach the veth to Your Container Bridge
/interface bridge port add bridge=bridge1-container interface=veth-ocserv
If you already have other containers running on bridge1-container, this just adds ocserv alongside them. They won’t interfere with each other.
Step 3 — Create a Persistent Config Mount
This is the step people skip and then regret. Without a persistent mount, every time the container restarts it regenerates its TLS certificates — which means your clients get a certificate warning and you have to redistribute the CA all over again.
/container mounts add name=ocserv-config src=/ocserv/config dst=/etc/ocserv list=ocserv
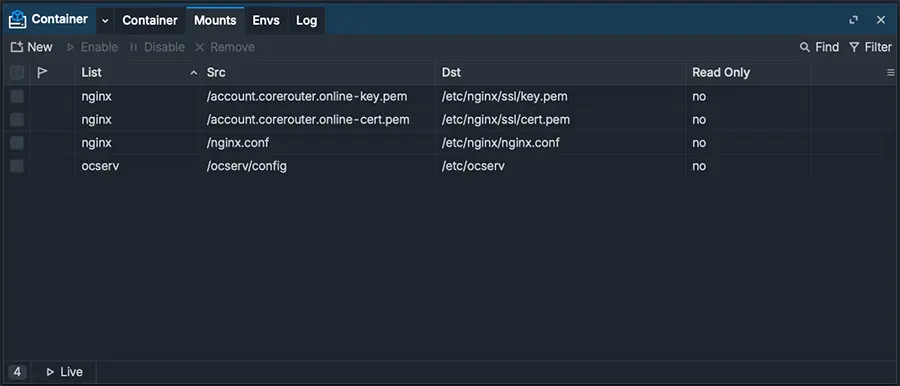
The /ocserv/config folder on the router gets created automatically on first run. Your certificates and user credentials live there and survive reboots and image updates without you having to do anything.
Step 4 — Set the Environment Variables
The aminvakil/ocserv image handles TLS certificate generation automatically on first boot, using the environment variables you pass in. Here’s what you need:
/container envs
add key=CA_CN list=ocserv value="OpenConnect CA"
add key=CA_ORG list=ocserv value=MyOrg
add key=CA_DAYS list=ocserv value=3650
add key=SRV_CN list=ocserv value=YOUR.PUBLIC.IP
add key=SRV_ORG list=ocserv value=MyOrg
add key=SRV_DAYS list=ocserv value=3650
add key=NO_TEST_USER list=ocserv value=1
add key=OC_IPV4_NETWORK list=ocserv value=10.10.10.0
add key=OC_IPV4_NETMASK list=ocserv value=255.255.255.0
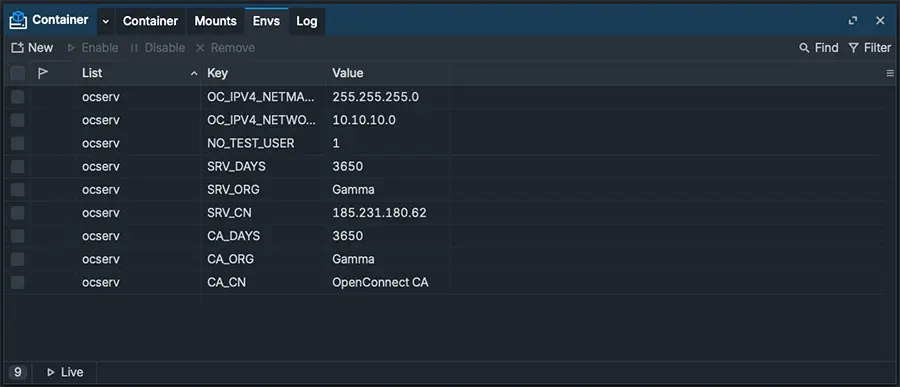
CA_CN / CA_ORG / CA_DAYS — Your self-signed CA details SRV_CN — Set this to your public IP or domain. This goes into the server certificate. NO_TEST_USER=1 — Disables the default test/test account. Always set this. OC_IPV4_NETWORK / OC_IPV4_NETMASK — The IP pool your VPN clients will get addresses from
One thing that will quietly break your setup if you get it wrong: do not wrap values in extra quotes. The correct form is value=MyOrg, not value=””MyOrg””. RouterOS handles the quoting itself. Extra escaping causes certtool to fail with “Warning: skipping unknown option” and produces a corrupt CA — one that looks fine in the logs until your client actually tries to connect.
Step 5 — Create the ocserv MikroTik container
/container add name=ocserv
remote-image=aminvakil/ocserv:latest
interface=veth-ocserv
envlists=ocserv
mountlists=ocserv
root-dir=/ocserv/root
hostname=ocserv
logging=yes
start-on-boot=yes
workdir=/etc/ocserv
Two things to pay attention to here.
- First, make sure you include start-on-boot=yes so the ocserv MikroTik container comes back up automatically after a reboot. It’s easy to skip and then wonder why your VPN is down after a power cycle.
- Second, adding the container triggers the image download automatically. Monitor the progress with:
/log/print where topics~"container"
Wait until you see: container,info ocserv: container stopped
That’s completely normal. On first boot, the container runs a setup script to generate the certificates and then stops. It’s not broken — it’s just finished with the first-run setup. Start it properly now:
/container/start [find name=ocserv]
Check the logs one more time and look for these two lines:
listening on 0.0.0.0:443 (TCP) listening on 0.0.0.0:443 (UDP DTLS)
Both lines means the server is up and ready.
Step 6 — Firewall Rules
Port Forwarding — External 4433 to Container 443
/ip firewall nat
add chain=dstnat action=dst-nat in-interface=ether1 protocol=tcp dst-port=4433 to-addresses=172.18.0.3 to-ports=443 comment="ocserv TCP" place-before=0
add chain=dstnat action=dst-nat in-interface=ether1 protocol=udp dst-port=4433 to-addresses=172.18.0.3 to-ports=443 comment="ocserv UDP/DTLS" place-before=0
You need both TCP and UDP. OpenConnect uses TCP for the TLS handshake and initial setup, then switches to DTLS over UDP for the actual data tunnel. DTLS gives significantly better performance — if you only forward TCP it still works, but it falls back to TCP for everything and you’ll notice the difference.
Allow Traffic in the Firewall Filter
/ip firewall filter
add chain=input action=accept protocol=tcp dst-port=4433 comment="Allow OpenConnect TCP" place-before=0
add chain=input action=accept protocol=udp dst-port=4433 comment="Allow OpenConnect UDP/DTLS" place-before=0
add chain=forward action=accept src-address=10.10.10.0/24 comment="Allow OpenConnect VPN forward" place-before=0
Masquerade VPN Client Traffic
VPN clients get addresses in the 10.10.10.0/24 range. For their traffic to go out through your WAN correctly, you need a masquerade rule:
/ip firewall nat
add chain=srcnat action=masquerade src-address=10.10.10.0/24 out-interface=ether1 comment="ocserv VPN clients NAT"
This is what lets your VPN clients actually reach the internet. Without it, their packets go out with a private source address and never come back.
Step 7 — Add VPN Users
Shell into the running container:
/container/shell [find name=ocserv]
Then manage users with ocpasswd:
Add a user (you’ll be prompted for a password)
ocpasswd -c /etc/ocserv/ocpasswd username
Change a password
ocpasswd -c /etc/ocserv/ocpasswd username
Delete a user
ocpasswd -c /etc/ocserv/ocpasswd -d username
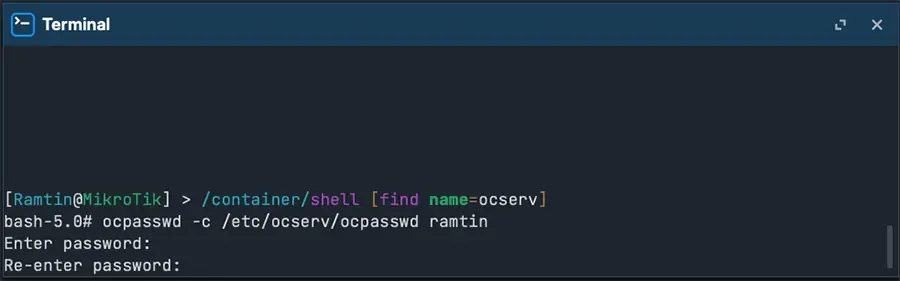
Credentials are stored in /etc/ocserv/ocpasswd on the persistent mount, so they survive container restarts and image updates.
Step 8 — Connect Your Clients
Server: Your public IP or domain
- Port: 4433
- Protocol: SSL / OpenConnect / AnyConnect Username /
- Password: Whatever you set in Step 7
- Accept certificate: Yes on first connect (self-signed)
Any AnyConnect-compatible client works — Cisco AnyConnect, the open-source OpenConnect client, or mobile apps on Android and iOS. On first connection you’ll get a certificate warning because the cert is self-signed. Accept it once and the client remembers it from then on.
Optional — Get Rid of the Certificate Warning
If you want clients to connect without any warnings, export the CA and install it as trusted on their devices.
Shell into the container:
/container/shell [find name=ocserv]
Then:
cat /etc/ocserv/ssl/ca.pem
Copy that output and install it as a trusted CA on your client devices. After that, the connection is completely clean.
How the Traffic Actually Flows
Just so the full picture is clear:
- Client connects to YOUR.PUBLIC.IP:4433
- MikroTik ether1 receives it
- dstnat forwards tcp/udp 4433 to 172.18.0.3:443
- ocserv container handles the TLS handshake and assigns the client a 10.10.10.x address
- Client traffic comes back out of the container sourced from 10.10.10.x
- srcnat masquerades it to your WAN IP
- Traffic goes out ether1 to the internet
- Replies come back, get translated, and reach the client
Troubleshooting
- broken tar during image extraction — tmpdir is not set. Run /container/config/set tmpdir=/pull
- Container exits right after first start — This is normal. First run generates certificates then stops. Run /container/start again.
- Warning: skipping unknown option in logs — Extra escaping in env var values. Remove all env vars and re-add them with plain value=MyOrg format.
- Base64 unexpected header error in logs — Corrupt CA from bad env vars. Delete /ocserv/config/ssl/, fix the env vars, restart the container.
- listening on 0.0.0.0:443 never appears — Check env var format. Run /log/print where topics~”container” and read carefully.
- Clients connect but have no internet — Missing the srcnat masquerade rule for 10.10.10.0/24. Add it and test again.
- Port conflict on 443 — Another service is using 443. Use external port 4433 for ocserv as shown in this guide.
Full Copy-Paste Config for ocserv MikroTik container
/container/config/set registry-url=https://registry-1.docker.io tmpdir=/pull
/interface veth add name=veth-ocserv address=172.18.0.3/24 gateway=172.18.0.1
/interface bridge port add bridge=bridge1-container interface=veth-ocserv
/container mounts add name=ocserv-config src=/ocserv/config dst=/etc/ocserv list=ocserv
/container envs
add key=CA_CN list=ocserv value="OpenConnect CA"

add key=CA_ORG list=ocserv value=MyOrg

add key=CA_DAYS list=ocserv value=3650

add key=SRV_CN list=ocserv value=YOUR.PUBLIC.IP

add key=SRV_ORG list=ocserv value=MyOrg

add key=SRV_DAYS list=ocserv value=3650

add key=NO_TEST_USER list=ocserv value=1

add key=OC_IPV4_NETWORK list=ocserv value=10.10.10.0

add key=OC_IPV4_NETMASK list=ocserv value=255.255.255.0

/container add

name=ocserv remote-image=aminvakil/ocserv:latest interface=veth-ocserv envlists=ocserv mountlists=ocserv root-dir=/ocserv/root hostname=ocserv logging=yes start-on-boot=yes workdir=/etc/ocserv
Wait for pull + first-run cert generation, then:
/container/start [find name=ocserv]
/ip firewall nat
add chain=dstnat action=dst-nat in-interface=ether1 protocol=tcp dst-port=4433 to-addresses=172.18.0.3 to-ports=443 comment="ocserv TCP" place-before=0
add chain=dstnat action=dst-nat in-interface=ether1 protocol=udp dst-port=4433 to-addresses=172.18.0.3 to-ports=443 comment="ocserv UDP/DTLS" place-before=0
/ip firewall filter add chain=input action=accept protocol=tcp dst-port=4433 comment="Allow OpenConnect TCP" place-before=0
add chain=input action=accept protocol=udp dst-port=4433 comment="Allow OpenConnect UDP/DTLS" place-before=0
add chain=forward action=accept src-address=10.10.10.0/24 comment="Allow OpenConnect VPN forward" place-before=0
/ip firewall nat add chain=srcnat action=masquerade src-address=10.10.10.0/24
out-interface=ether1 comment="ocserv VPN clients NAT"
Final Thoughts
Honestly the container itself is the straightforward part. The pieces that trip people up are almost always the same two things — the tmpdir being missing before the pull, and the env var quoting issue on first boot. Get those right and the rest falls into place quickly.
If you’re already running the Nginx container on MikroTik or have a V2Ray setup going, the workflow here is going to feel very familiar. Same bridge, same veth pattern, different container with different firewall requirements.
If you run into something that’s not in the troubleshooting section, drop it in the comments below. There’s a good chance someone else has hit the exact same wall.