If you run more than one web application behind a MikroTik router, you’ve probably faced a familiar problem: you have several services, several domain names, but only one public IP address.
Until recently, RouterOS wasn’t really the place where I would think about solving this with a native reverse proxy. You would normally put something like Nginx, HAProxy, Traefik, or another reverse proxy somewhere in front of your applications.
RouterOS now has a built-in Reverse Proxy feature, so I wanted to see how well it works in a real setup.
In this lab, I’m going to publish three different web applications:
- File Browser
- IT-Tools
- Homepage
All three applications will run as containers on the MikroTik itself, but they’ll have separate internal IP addresses and ports.
On the public side, each application will have its own domain name:
- file.netadminhub.com
- it.netadminhub.com
- home.netadminhub.com
The interesting part is that all three domains point to the same public IP address.
MikroTik will terminate the HTTPS connections, look at the requested hostname using SNI, and send each connection to the correct backend.
What We’re Building
Here is the lab architecture:
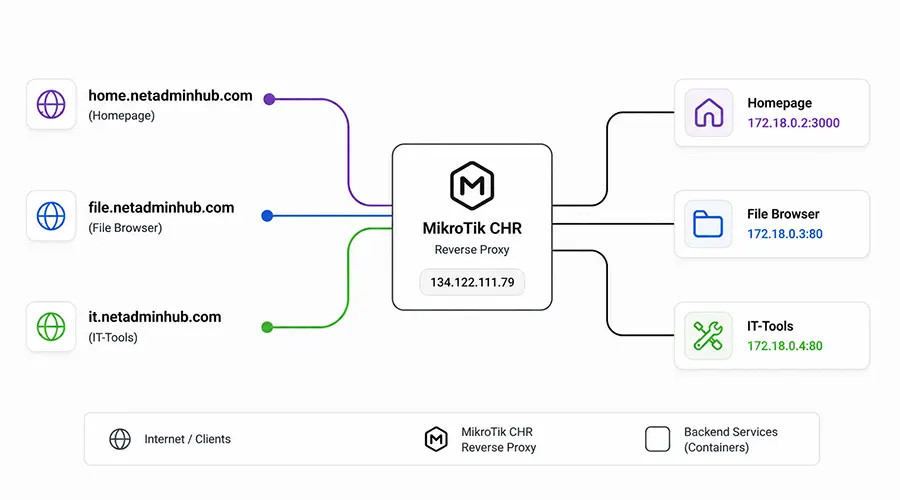
The container network itself is 172.18.0.0/24 and the MikroTik side of that network is 172.18.0.1.
For this lab I’m using a MikroTik CHR, but the basic Reverse Proxy idea isn’t tied to CHR or even to containers.
A backend can be another server, VM, NAS, or web application somewhere else on your network. As long as the MikroTik can reach the backend IP address and port, it can be used as a Reverse Proxy destination. The current RouterOS Reverse Proxy configuration exposes the backend IP address, port, SNI, certificate, and VRF for this purpose.
Before You Start
There are a few things you should have ready before following this setup.
You need a RouterOS device that supports the Reverse Proxy feature, and if you want to reproduce my exact lab, you also need the RouterOS Container package and container mode enabled.
MikroTik currently supports RouterOS containers on ARM, ARM64, and x86, while Reverse Proxy itself is not supported on SMIPS devices. MikroTik also strongly recommends external storage for container workloads instead of keeping container data on the router’s internal flash.
You’ll also need:
- A public IP address
- Domain names you control
- DNS records pointing those domains to the MikroTik
- TCP 80 reachable from the Internet if you want MikroTik to obtain certificates using ACME HTTP-01
- TCP 443 available for the Reverse Proxy service
One important detail: RouterOS reverse-proxy uses TCP 443 by default, which is also the default port for the www-ssl service. You can’t have both fighting over the same port, so www-ssl needs to be disabled or moved to another port.
Step 1: Create the Container Network
Let’s start with a dedicated bridge for the containers.
/interface/bridge
add name=bridge-containers
Assign 172.18.0.1/24 to the MikroTik side:
/ip/address
add address=172.18.0.1/24 interface=bridge-containers comment="Container Network"
Now add a source NAT rule so containers can reach the Internet:
/ip/firewall/nat
add chain=srcnat action=masquerade src-address=172.18.0.0/24 comment="Containers Internet Access"
That single masquerade rule covers all three containers. There’s no need to create one NAT rule per application.
This bridge + VETH + masquerade design follows the standard container networking model documented by MikroTik.
Step 2: Deploy File Browser
I’m starting with File Browser because it also gave me a small permission problem during testing, and it’s worth documenting rather than pretending labs always work perfectly on the first attempt.
Create its VETH interface:
/interface/veth
add name=veth-files address=172.18.0.3/24 gateway=172.18.0.1
Add it to our container bridge:
/interface/bridge/port
add bridge=bridge-containers interface=veth-files
Now create the container:
/container
add remote-image=filebrowser/filebrowser:latest interface=veth-files root-dir=/containers/filebrowser name=filebrowser user=0:0 start-on-boot=yes logging=yes
Notice this part: user=0:0
In my lab, File Browser needed to run as root for the service to bind correctly to port 80. RouterOS supports specifying the user used to run a container, and MikroTik also documents user=0:0 as an option for containers that require additional privileges.
Once RouterOS finishes downloading and extracting the image, start it:
/container/start [find where name="filebrowser"]
You can check the status with:
/container/print
And if you want to verify what is actually happening inside the container:
/container/shell [find where name="filebrowser"]
Then:
ip a
netstat -tnlp
In my lab, this confirmed:
- IP: 172.18.0.3
- Port: 80
Finally, test it directly from MikroTik:
/tool/fetch url="http://172.18.0.3" output=none
I get:
status: finished code: 200
So File Browser is ready.
Step 3: Deploy IT-Tools
IT-Tools is even simpler.
Create another VETH:
/interface/veth
add name=veth-tools address=172.18.0.4/24 gateway=172.18.0.1
Attach it to the bridge:
/interface/bridge/port
add bridge=bridge-containers interface=veth-tools
Create the container:
/container
add remote-image=corentinth/it-tools:latest interface=veth-tools root-dir=/containers/it-tools name=it-tools start-on-boot=yes logging=yes
Wait for the image to finish downloading and extracting, then start it:
/container/start [find where name="it-tools"]
Again, you can verify it from inside:
/container/shell [find where name="it-tools"]
Then
ip a
netstat -tunlp
My container shows:
- IP: 172.18.0.4
- Port: 80
Test it from RouterOS:
/tool/fetch url="http://172.18.0.4" output=none
The expected result is: code:200
That gives us our second backend.
Step 4: Deploy Homepage
Homepage needs a little more configuration.
First, create its VETH:
/interface/veth
add name=veth-homepage address=172.18.0.2/24 gateway=172.18.0.1
Add it to the bridge:
/interface/bridge/port
add bridge=bridge-containers interface=veth-homepage
Configure Allowed Hosts
Homepage validates the hostname used to access the application, so we’ll provide the public hostname as an environment variable.
/container/envs
add list=homepage-env key=HOMEPAGE_ALLOWED_HOSTS value="home.netadminhub.com,172.18.0.2:3000"
Create the Homepage Config Mount
Homepage also needs persistent access to /app/config.
Create the mount:
/container/mounts
add list=homepage-config src=/containers/homepage-config dst=/app/config
This part matters.
During my first attempt, I started Homepage without this mount. The container itself started, but requests returned HTTP 500 and the RouterOS logs eventually showed errors such as:
ENOENT: no such file or directory
/app/config/settings.yaml
Adding the config mount fixed the problem.
RouterOS mount lists map a source directory on RouterOS to a destination inside the container. If the source directory doesn’t already exist, RouterOS can populate it from the container destination on first use.
Now create Homepage:
/container
add remote-image=ghcr.io/gethomepage/homepage:latest interface=veth-homepage root-dir=/containers/homepage mountlists=homepage-config envlist=homepage-env name=homepage start-on-boot=yes logging=yes
Wait until the image has finished extracting, then:
/container/start [find where name="homepage"]
Check:
/container/print
In my lab, Homepage eventually reports:
HEALTHY
You can also enter the container:
/container/shell [find where name="homepage"]
and verify:
ip a
netstat -tunlp
The result should show:
IP: 172.18.0.2 Port: 3000
Then test it:
/tool/fetch url="http://172.18.0.2:3000" output=none
And, if you want to test the actual hostname:
/tool/fetch url="http://172.18.0.2:3000" http-header-field="Host: home.netadminhub.com" output=none
Both return HTTP 200 in my final setup.
Our Three Backends Are Ready
At this point we have: 172.18.0.3:80``file.netadminhub.com``172.18.0.4:80``it.netadminhub.com``172.18.0.2:3000``home.netadminhub.com
| Application | Backend | Public Domain |
|---|---|---|
| File Browser | ||
| IT-Tools | ||
| Homepage |
Before touching Reverse Proxy, I strongly recommend testing every backend directly.
If MikroTik itself cannot reach your backed services, there’s little point debugging HTTPS, certificates, DNS and SNI yet.
Get the backend working first. Then add the next layer.
It sounds obvious, but networking has an impressive ability to convince us to debug layer seven while layer three is quietly on fire.
Step 5: Configure DNS
Now we need all three domain names to resolve to the same public IP.
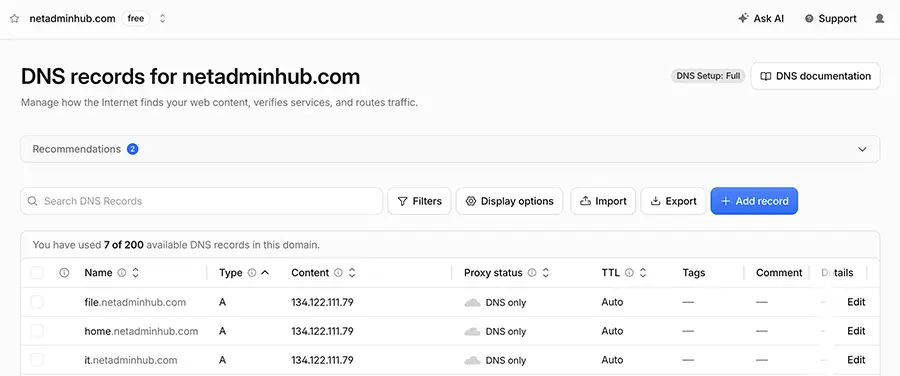
There is no requirement for three public IP addresses.
That is the whole point of this setup.
When an HTTPS client connects, MikroTik can use the hostname provided through SNI, or Server Name Indication, to determine which Reverse Proxy rule should handle the connection.
So the IP address gets the client to the router.
The hostname tells the router where the connection needs to go.
Step 6: Prepare RouterOS Services
Before requesting certificates or creating Reverse Proxy rules, check:
/ip/service/print
There are two ports we care about:
- TCP 80
- TCP 443
For the ACME HTTP-01 challenge, TCP 80 needs to be reachable from the WAN. MikroTik’s current ACME implementation requires the requested domain to resolve to the router and port 80 to be accessible from the Internet.
For Reverse Proxy, TCP 443 is normally used.
There’s one easy trap here.
RouterOS www-ssl also uses TCP 443 by default. MikroTik explicitly warns that www-ssl and Reverse Proxy cannot both use the same port, so disable www-ssl or move it elsewhere before enabling Reverse Proxy on 443.
In my setup, www-ssl is disabled.
Step 7: Get Let’s Encrypt Certificates
RouterOS includes an ACME client, so we don’t need Certbot or another external machine just to obtain these certificates.
MikroTik currently uses:
/certificate/add-acme
For example:
/certificate/add-acme domain-names=home.netadminhub.com
Then:
/certificate/add-acme domain-names=file.netadminhub.com
And:
/certificate/add-acme domain-names=it.netadminhub.com
I use WinBox in the video because it makes this part easier to follow visually, but the result is the same.
RouterOS automatically manages ACME certificates and renews them when 80% of their validity period has elapsed.
If certificate issuance fails, check the boring things first:
Does the domain resolve correctly? ↓ Does it point to this router? ↓ Is TCP 80 reachable from the Internet? ↓ Is a firewall or upstream provider blocking it?
Certificate problems have a remarkable talent for looking mysterious while actually being DNS.
Step 8: Configure the Reverse Proxy
Now we finally get to the interesting part.
RouterOS Reverse Proxy rules are configured under:
/ip/reverse-proxy
Each entry can define:
- Backend IP address
- Backend port
- SNI hostname
- Certificate
- VRF
- Comment
These are the core parameters exposed by the current RouterOS Reverse Proxy implementation.
HTTPS Outside, HTTP Inside
There’s another useful detail in this architecture.
Take File Browser as an example.
The browser opens:
https://file.netadminhub.com
So from the Internet side, the connection is encrypted with HTTPS.
But File Browser itself is listening internally on:
172.18.0.3:80
That means the application itself doesn’t need to manage the public TLS certificate.
MikroTik handles the public HTTPS side and proxies the connection to the backend.
For small internal applications, labs, dashboards and similar services, this can make deployment much cleaner.
Your Backends Don’t Have to Be Containers
I used MikroTik containers in this article because they make for a nice self-contained lab.
But Reverse Proxy doesn’t care whether your backend happens to be running inside a RouterOS container.
For example, you could have:
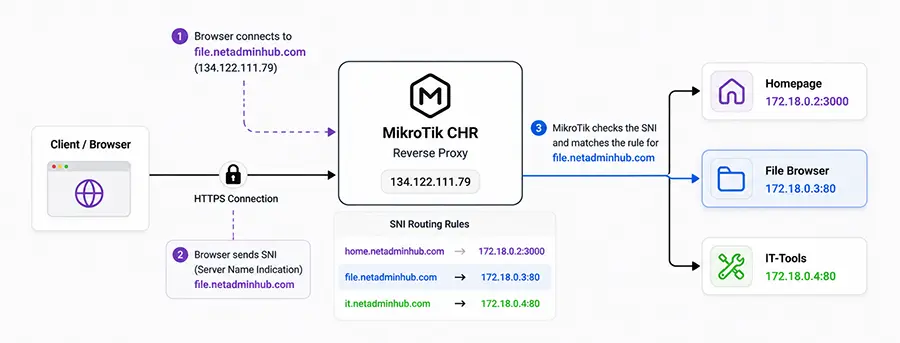
Or the backend could be:
- A VM
- A NAS
- A local dashboard
- An internal web server
- Another physical server
- An application hosted on another reachable network
The important part is simply that the router can reach the configured backend IP address and port.
That makes the feature much more useful than just a way to expose RouterOS containers.
One Limitation I Found While Testing
There is one thing I would be careful about before putting this into production.
During my testing, I also tried putting Uptime Kuma behind the RouterOS Reverse Proxy.
The normal web interface loaded, but the WebSocket connection did not work correctly with my setup.
I want to be precise here: I’m not saying RouterOS Reverse Proxy can never work with WebSockets in every possible configuration.
I’m saying it did not work in the configuration I tested.
That distinction matters.
The Reverse Proxy implementation is still much simpler than mature dedicated reverse proxies, and the current MikroTik documentation exposes a relatively small set of configuration options: backend IP, port, SNI, certificate, VRF, and comment.
So if the application you’re publishing depends on:
- WebSockets
- Special HTTP headers
- Unusual upgrade behavior
- Application-specific proxy settings
test it before using it in production.
For a straightforward HTTPS web application, the setup can be surprisingly simple.
For something more complicated, don’t assume that because the login page appeared, everything behind it is working.
Final Thoughts
I like this feature.
Not because MikroTik suddenly replaces Nginx, HAProxy or Traefik. It doesn’t.
What makes RouterOS Reverse Proxy interesting is that there are plenty of situations where adding another VM or another piece of infrastructure just to publish a few internal web applications feels unnecessary.
If the MikroTik is already sitting at the edge of the network, already owns the public IP, already handles the routing, and can also manage the TLS certificates, having a simple Reverse Proxy available directly in RouterOS can be genuinely useful.
For this lab, we ended up with:
- file.netadminhub.com → 172.18.0.3:80
- it.netadminhub.com → 172.18.0.4:80
- home.netadminhub.com → 172.18.0.2:3000
All three are published over HTTPS.
All three use different domain names.
And all three share One public IP.
That’s exactly the kind of small infrastructure problem where this feature makes sense.
Just keep the scope in mind. Test your application, especially if it uses WebSockets or other behavior beyond straightforward web traffic, before deciding that the router can replace a dedicated reverse proxy in production.