We’ve all dealt with that one corner of the house or office where the WiFi signal just disappears. Usually, the first thought is to buy a brand-new mesh system or start drilling holes to run Ethernet cables. But if you have a router running ****OpenWRT, there’s a much easier way to handle it.
I was messing around with a spare router the other day, trying to remember the “correct” manual way to bridge interfaces, and then it hit me: the “Join Network” button in the LuCI interface actually does all the heavy lifting for you. By this, OpenWRT creates the virtual interfaces and sets up the firewall rules automatically. It’s one of those simple features that’s easy to overlook but saves a ton of time.
Watch the full walkthrough on the Net Admin HUB YouTube channel:
OpenWRT WiFi Range Extender: Step-by-Step Setup
Here is how I usually get this running in just a few minutes.
1. Avoid the IP Conflict (The Most Important Step)
Before you do anything, check the IP address of your main home router. If it’s 192.168.1.1 and your OpenWRT router is also 192.168.1.1, they will fight each other.
- Go to Network > Interfaces > LAN.
- Change the IPv4 address to something different, like
192.168.10.1. - Save and apply, then log back in using the new IP.
2. Enable Your Wireless Cards
By default, WiFi is often disabled on a fresh OpenWRT install.
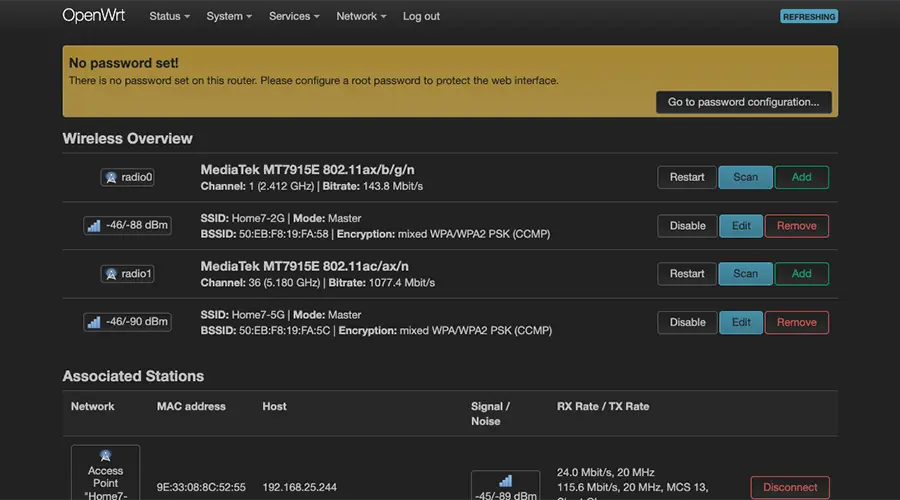
- Go to Network > Wireless.
- Click Enable on your radio cards.
- Give your local Access Point a name (SSID) and a password under the Wireless Security tab so your devices have something to connect to.
3. Joining the Main Network
This is the part that makes it easy. Instead of creating a new interface manually:
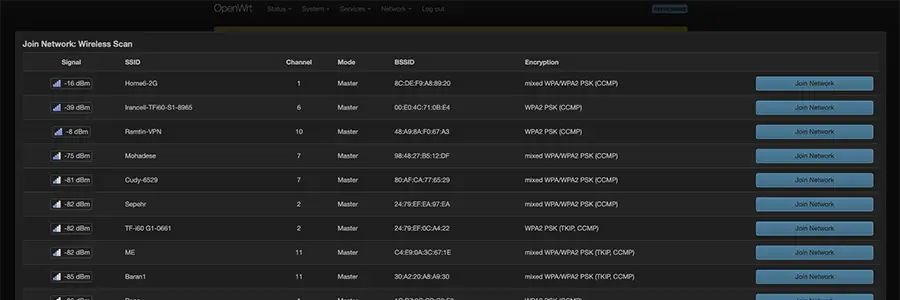
- Click the Scan button on the radio you want to use (2.4GHz is usually better for range).
- Find your home WiFi and click Join Network.
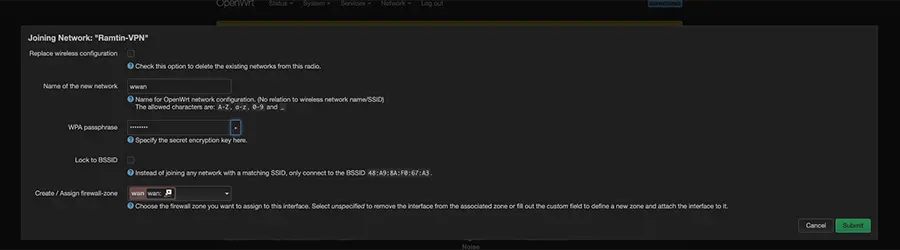
- Enter your WiFi password.
- The “Magic” Step: On the next screen, OpenWRT will suggest a name for the new interface (like
wwan) and assign it to the wan firewall zone. Leave these as they are! This ensures your firewall allows internet traffic through to your devices automatically.
4. Save and Test
Once you hit Submit and then Save & Apply, give it about 30 seconds. Your router will now be connected to your main WiFi as a client while still acting as an access point for your phone or laptop.
Final Thoughts
It’s funny how often we expect networking to be a massive headache, only to find out the tools we already have make it pretty simple. This repeater setup is a solid way to kill dead zones without over-complicating your life.
Did this help you get your signal into that far room? If you ran into any weird driver issues or have a better way of doing it, let me know in the comments below!